LDAP Configuration Guide for Drupal 7
Install Server Prerequisites
Before you can get the LDAP module for Drupal up and functioning, you have to have certain prerequisites already installed and setup on the server.
For Linux
Server packages required to support the Drupal LDAP module.
- $ sudo apt-get install php5-ldap
- $ sudo apt-get install php5-mcrypt (Optional for encrypting stored passwords)
For Windows
- Please check ldap.dll file is present at "/xampp/php/ext/" before enabling.
- Enable the extension “extension=php_ldap.dll” by removing semicolon.
- Execute phpinfo() to verify whether ldap extension is enabled or not.
- If enabled, you can proceed further.
Install Drupal Modules
Install Drupal Modules
Installation of the following modules is required for proper LDAP functionality.
- Entity API: http://drupal.org/project/entity
- LDAP: http://drupal.org/project/ldap
- Devel: http://drupal.org/project/devel (Optional for testing user functionality)
- Login as an administrator to the Drupal site.
- Navigate to Modules.
- Click Install new module.
- Locate the tar.gz download for the module you are installing (ex: https://ftp.drupal.org/files/projects/entity-7.x-1.8.tar.gz for the Entity API module).
- Place URL into the Install from a URL textbox (can manually install as well if you’ve downloaded the module locally).
- Click Install.
- Repeat for each module listed above.
Enable Installed Drupal Modules
The modules will need to be enabled (usually in a specific order due to module requirements).
- Enable the Entity API module first (under other) and Save Configuration.
- Enable Devel and Save Configuration (Optional to test user functionality).
- Enable LDAP Servers and Save Configuration.
- Enable LDAP User Module and Save Configuration.
- Enable the following and Save Configuration :
- LDAP Authentication
- LDAP Authorization
- LDAP Help (optional)
- LDAP Test (optional)
- Enable LDAP Authorization – Drupal Roles and Save Configuration.
Configure LDAP Settings
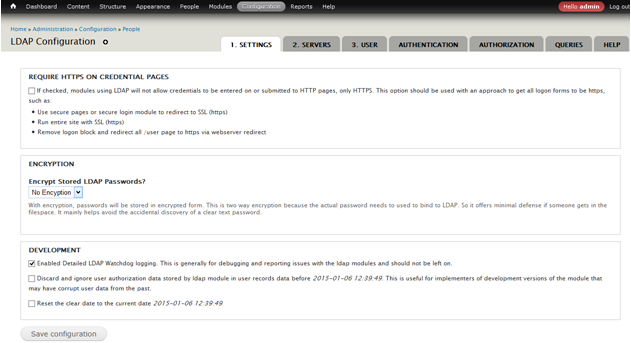
General Settings
- Set Encrypt Stored LDAP Passwords to No encryption, if you need encrypted password then select Blowfish:
Servers
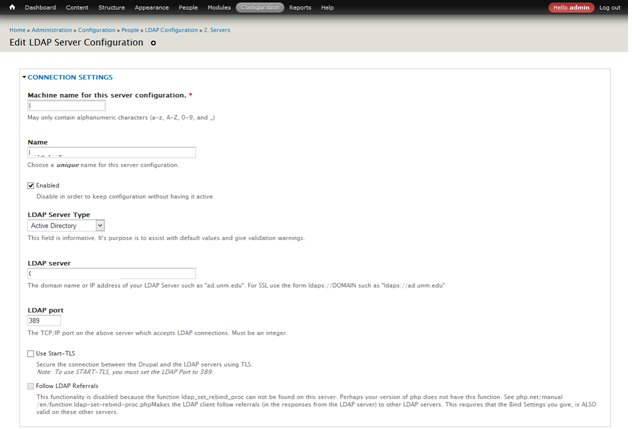
- Click Add LDAP Server Configuration.
- Give an unique name for the Machine name and name (ex: ad.unlv.edu).
- Select Enabled.
- Select Active Directory for the LDAP Type.
- Use servername provided to you as the LDAP Server.
- Use 389 as the LDAP Port.
- If checked, uncheck Use Start-TLS.
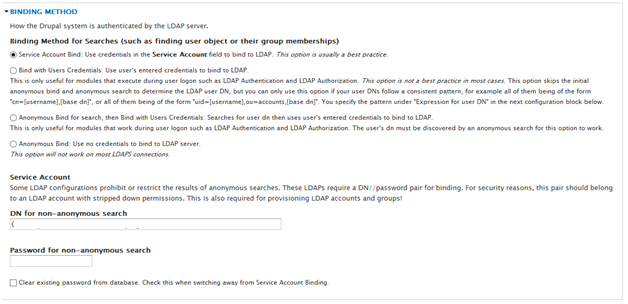
- Select Service Account Bind as the Binding Method.
- Enter the DN for the Service Account to be used.
- Enter the account password.
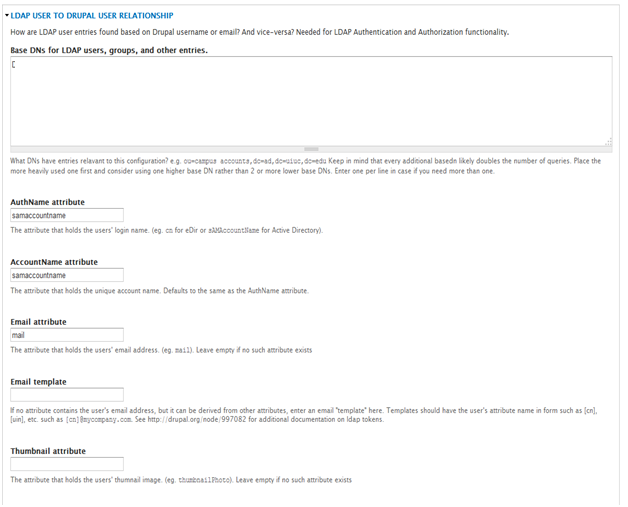
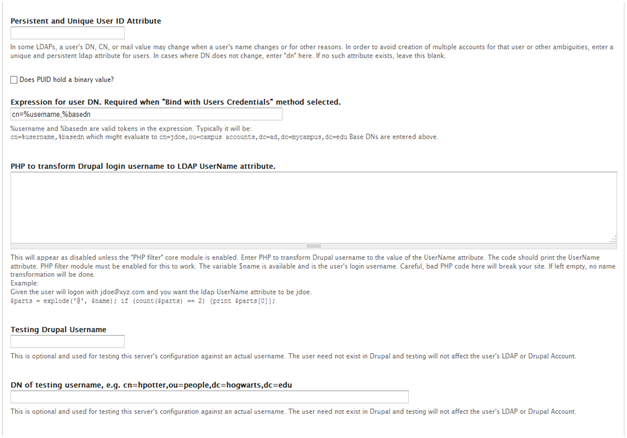
- Setup the Base DNs.
- Enter samaccountname as the AuthName attribute.
- Enter mail as the Email attribute.
- Enter a testing username and DN (Optional to test the connection).
- Enter group as the Name of Group Object Class..
- Select Nested groups are used in my LDAP (Optional if you have nested groups and you want to treat them as nested).
- Select a user LDAP attribute such as memberOf exists…
- Enter memberof as Attribute in User Entry Containing Groups.
- Enter memberuid as the LDAP Group Entry Attribute Holding User’s DN…
- Enter cn as the User attribute held in “Attribute of User’s LDAP entry DN…”
- Enter test DN for a test group (Optional for testing groups).
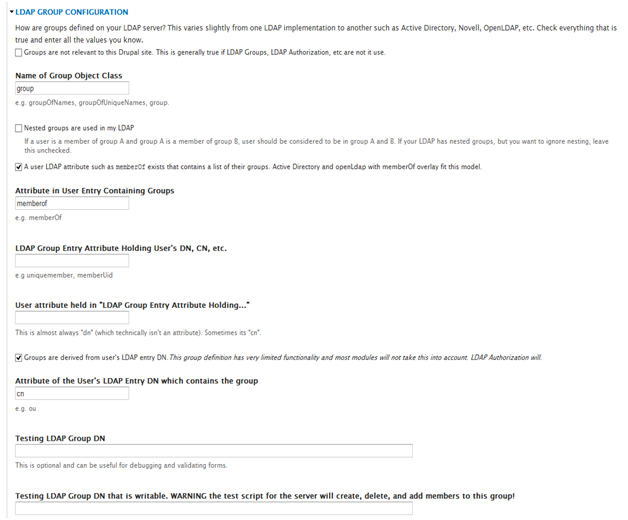
- Uncheck Use LDAP Pagination if checked.
- Click Update.
User
Some settings are dependent on how you want accounts to function.
- Select Reject manual creation of Drupal accounts… for How to resolve LDAP conflicts…
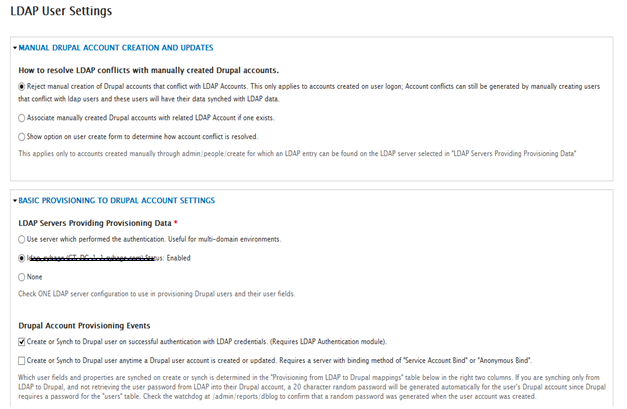
- Select ldap_server_name (or whatever it was named above) for LDAP Servers.
- Check Create or Sync to Drupal user on successful authentication… option.
- Select Associate Drupal account with LDAP entry under Existing Drupal User Account Conflict.
- Select Account creation settings… do not affect “LDAP Associated” Drupal Accounts under Application of Drupal Account settings…
- Select perform no action… under Action to perform on Drupal account that no longer has a corresponding LDAP entry.

- Select None under LDAP Servers to Provision LDAP Entries on.
- Click Save.
Authentication
Some settings are based on how you want authentication to function.
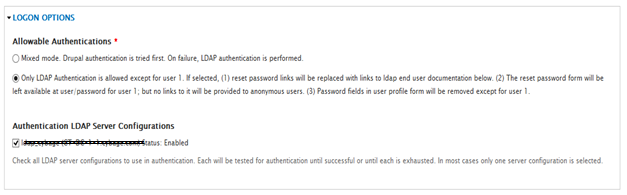
- Select Only LDAP Authentication is allowed under Allowable Authentications. NOTE: Only select this if you want to force login using AD, otherwise select mixed mode.
- Check ldap_server_name (or whatever it was named above) under the Authentication LDAP Server Configurations.
- Setup your login interface text.
- Keep User Login Interface and LDAP User "Whitelists" and Restrictions as it is.
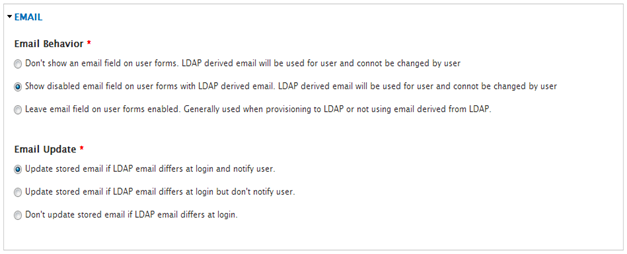
- Setup Email.
- Click Save.
Authorization
Some settings are based on how you want users to be mapped to roles.
- Click add under OPERATIONS.
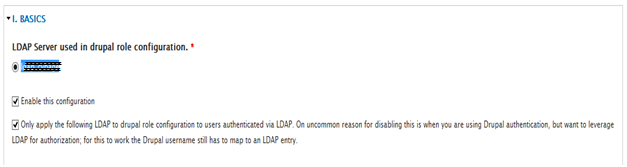
- Select ldap_server_name under LDAP Server used in drupal role configuration.
- Select enable this configuration.
- Select only apply the following LDAP…
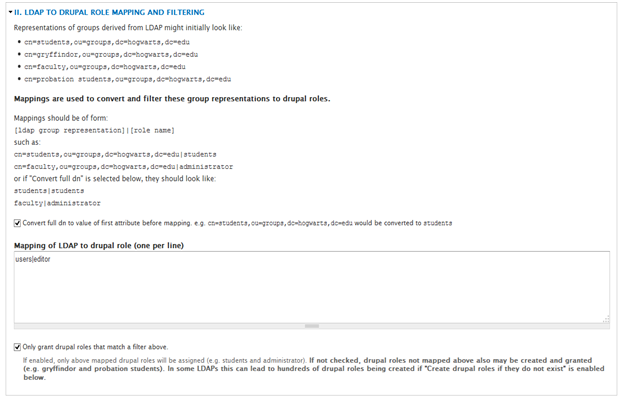
- Enter your DN to Drupal Role mappings.
- Select only grant drupal roles to match a filter above.
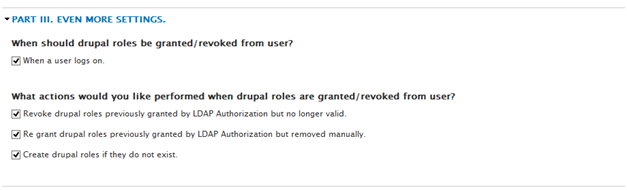
- Select when a user logs on under whendrupal roles should be granted…
- Select Revoke drupal roles previously granted…
- Select Re grant drupal roles previously granted…
- Uncheck if checked Create drupal roles if they do not exist.
- Click Add (or save, if updating).
Testing
Server Test
- Navigate to the SERVERS tab.
- Under OPERATIONS for your server, click test.
- Make sure a test username is entered.
- Click Test.
If you get no results, there was most likely a failure to bind to the LDAP.
User Test
- Navigate to the USER tab.
- Click Test LDAP User Functionality for a given user.
- Enter the username.
- Select Test Query.
- Click Test.
Authorization Test
- Navigate to the AUTHORIZATION tab.
- Click Test under OPERATIONS.
- Enter username(s).
- Click Test.
You can also see the full mapping by expanding the additional sections.
Comments
Timothyet (not verified)
Wed, 02/07/2018 - 18:48
You made some first rate
You made some first rate points there. I appeared on the web for the difficulty and found most individuals will associate with with your website.
Add new comment